Chocolate Simnel Cake
Serves: 12
Cost Cutting Eco Friendly Freezes Well
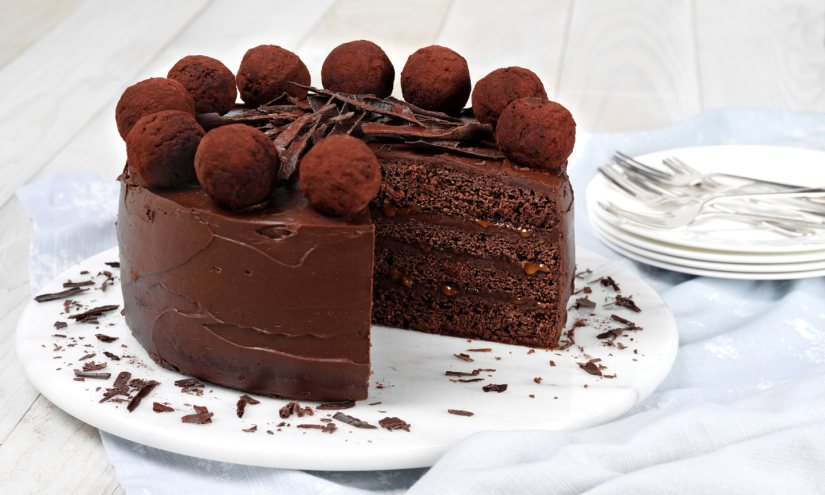
Shavings are the one of the easiest chocolate decorations to make as you don’t have to worry about the chocolate setting completely.
Ingredients:
100g Dr. Oetker 72 % Extra Dark Cooks’ Chocolate 225g unsalted butter, very soft 225g caster sugar 4 large free-range eggs 200g self raising flour 1 sachet Dr. Oetker Baking Powder 1 sachet Dr. Oetker Fine Dark Cocoa Powder For the decoration: 225g plain cake crumbs 1 sachet Dr. Oetker Fine Dark Cocoa Powder 40g golden syrup 5ml Dr. Oetker Caramel Flavour 15g unsalted butter, melted 150g Dr. Oetker 72% Extra Dark Fine Cooks’ Chocolate (& Extra Dark Chocolate shavings – see below) 150g Dr. Oetker Milk Fine Cook’s Chocolate 350ml double cream, at room temperature 140g sachet Dr. Oetker Salted Caramel Surprise Insidemethod:
- Preheat the oven to 180˚C/350˚F/Gas Mark 4. Grease and line 2 x deep 20cm diameter Victoria sandwich tins.
- Break the extra dark chocolate into pieces and place in a heatproof bowl. Put the bowl over a saucepan of barely simmering water and leave to melt. Remove from the water and leave aside for 10 minutes.
- Put the butter, sugar and eggs in a large mixing bowl and sift the flour, baking powder and cocoa powder on top. Add the melted chocolate. Using an electric whisk on a low speed, gently mix the ingredients together, then increase the speed and whisk for a few seconds more until well blended and thick.
- Divide the mixture between the prepared tins and smooth the tops. Put the tins on a baking tray and bake in the oven for about 30 minutes until firm and slightly risen. Cool for 10 minutes before removing from the tins and transferring to a wire rack to cool completely.
- To decorate, put the cake crumbs in a bowl and mix in half the sachet of Cocoa Powder along with the syrup, Caramel Flavour and melted butter. Mix well to bring the ingredients together then shape into 12 balls. Put on a lined plate or board and chill for at least 30 minutes or until firm.
- Meanwhile, slice each cake carefully through the middle to make 4 equal layers. Put to one side.
- Break up the extra dark and milk chocolate into pieces and put in a heatproof bowl, and place over a saucepan of barely simmering water to melt. Remove from the water and leave to cool for 10 minutes until warm but not hot.
- Whilst whisking the chocolate, gradually pour in the cream, whisking until thick and glossy. Using half of the chocolate cream spread evenly over 3 layers of the cake. Open the Salted Caramel Surprise Inside and squeeze out and spread over each of the chocolate cream covered layers. Sandwich all 4 cake layers together and transfer to a serving plate. Spread the rest of the chocolate cream over the top and sides of the cake.
- To serve, put the remaining Cocoa Powder in a small bowl and gently toss each chocolate truffle in the powder to lightly coat and then arrange round the top edge the cake. Pile the centre of the cake with chocolate shavings and sprinkle any smaller ones round the edge of the serving plate if liked. Dust the shavings with any remaining Cocoa Powder if liked.
- Leave the assembled cake in a cool place to firm up before serving. If the room temperature is warm, pop the cake in the fridge for a few minutes – prolonged chilling of the cake will result in a dry crumb texture. Your cake is now ready to serve and enjoy!
- For the chocolate curls, break 50g 72% Extra Dark Chocolate into pieces and place in a heatproof bowl. Put the bowl over a saucepan of barely simmering water and leave to melt. Remove from the water and mix well.
- Using a palette knife, spread the melted chocolate over an upturned clean, uncoated (not non-stick) or enamel baking sheet or clean board to make an approx. 20cm square. Leave in a cool place or chill for a few minutes until completely set. Line a board with baking parchment.
- Use a cheese slicer to scrape shavings of chocolate along the surface of the chocolate. Transfer to the board and keep in a cool place until ready to use.

Did you make this recipe?
Share your creations by tagging @livegreenandgood on Instagram with the hashtag #livegreenandgood


